

Automating repetitive actions with Selenium WebDriver and Node.js


Programmers - strange beings who want to automate every activity. Even if you are not a programmer, you probably know the feeling of frustration associated with repetitive tasks - and with the fact you're responsible for them, not someone else. You can accept it and get into the routine of repeating the same actions over and over again, or analyze the problem and find a solution. And the solution I want to recommend you is a bot.
Citing the concise Wikipedia definition:
Bot - is a program that performs certain tasks instead of a human. Sometimes its function is to pretend human behavior.
"...performs certain tasks instead of a human" - sounds great, doesn't it? The definition, however, begins with "a program" - and you might ask yourself where you can get this kind of software. Well, you can simply build it! If you don't know where to start, think of the steps you would follow to execute a chosen task - after all, a program is nothing more than a set of instructions. In this tutorial, I will show you how to do it using Selenium WebDriver for Node.js and a simple click game - Cookie Clicker.
In brief: Cookie Clicker is a free web time-eater. The player's goal is to click at the big cookie on the left side of the screen. With each click, we get points that can be exchanged for 'boosters' that will speed up the process of gaining new points. So basically it means lots of repetitive clicking... Sounds like a perfect bot environment, right? The entire game is available here.
The tools we need
First of all, we need a powerful tool, which is Node.js and the npm package manager. We'll download them from here. Of course, we can't do it without an IDE - the built-in terminal will be a big plus.
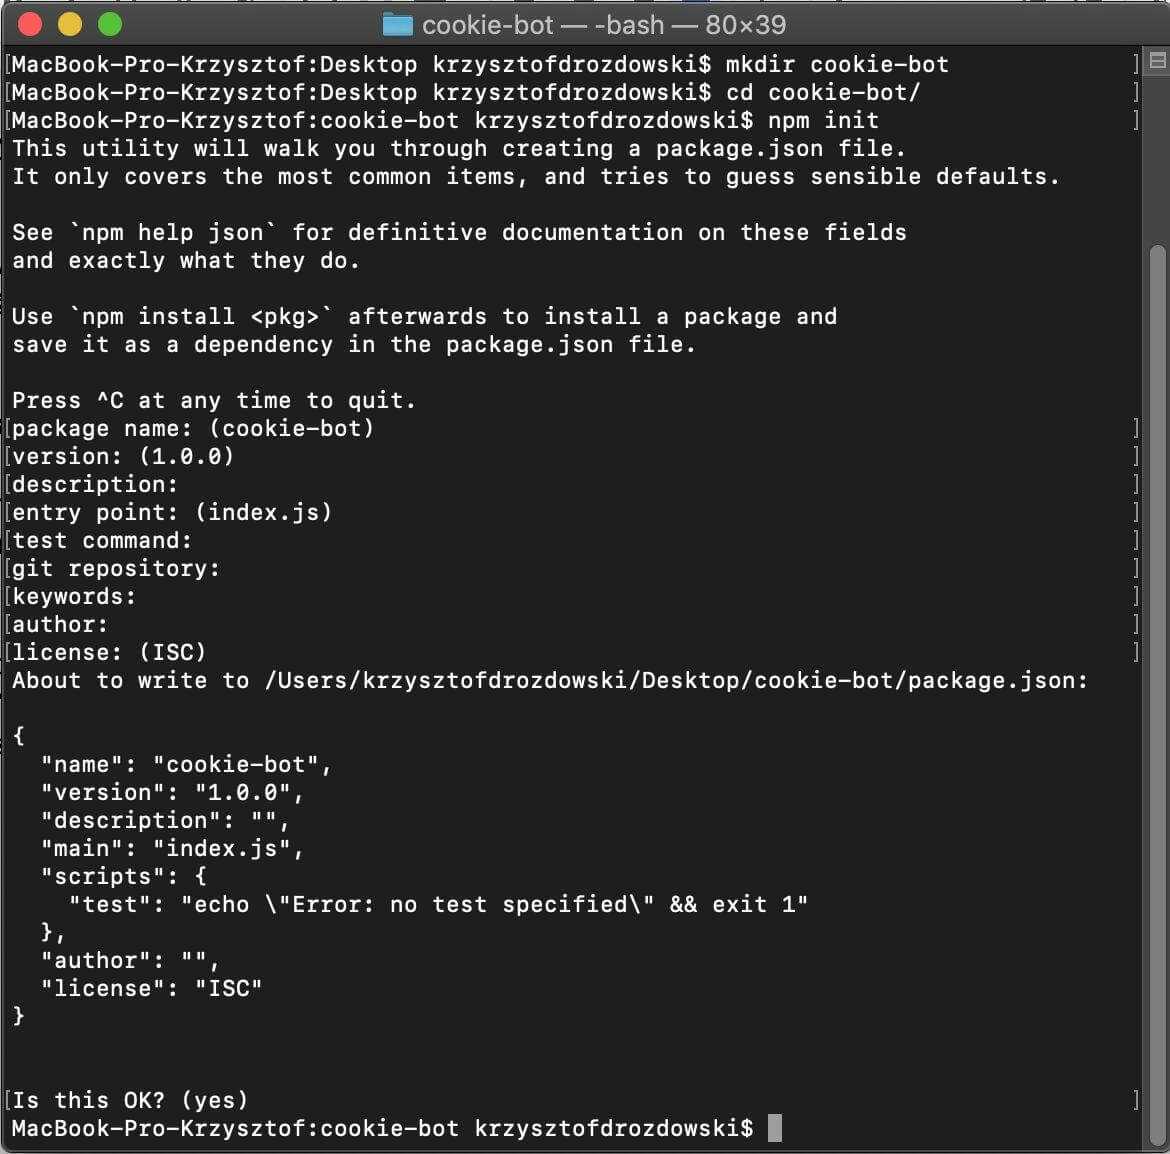
With a good editor, Node and npm, we are ready to initiate our project. How to do it? Very simply - we create a directory for our bot and use the terminal to enter the command npm init. It should look like this:
Now, we must equip our newly initiated project with tools to control the web application. Selenium WebDriver will come to the rescue! It’s commonly used in automated testing of web applications, but today we will use it for other purposes. We will also make use of a driver for the Chrome browser. The correct order should be as follows:
npm i selenium-webdriver
npm i chromedriver
Finally, our package.json file should look like this:
{
"name": "cookie-bot",
"version": "1.0.0",
"description": "",

"main": "index.js",
   "scripts": {
   "test": "echo \"Error: no test specified\" && exit 1"
},
"author": "",
"license": "ISC",
"dependencies": {
   "chromedriver": "^76.0.1",
   "selenium-webdriver": "^4.0.0-alpha.5"
  }
}
We code the bot
We'll start with creating a .js file in which we will keep the instructions for our bot - I named my file cookie-bot.js. Now we need to deal with the dependencies we downloaded earlier - that's why you will need to import them at the beginning:
const webdriver = require('selenium-webdriver');
const chrome = require('selenium-webdriver/chrome');
const chromedriver = require('chromedriver');
Then we will initialize the driver for our browser - in our case, for Chrome:
chrome.setDefaultService(new chrome.ServiceBuilder(chromedriver.path).build());
const driver = new webdriver.Builder().forBrowser('chrome').build();
And now it will start to get more interesting... First, I recommend something simple. If you haven't seen the game yet, then I encourage you to do it now (by clicking here). Our point of interest is the big cookie on the left:

I know, you feel tempted to click it - but we'll refrain from that. In the end, we're going to ignore the game's rules and cheat. Or, in other words, we will have our bot do it for us. How will our virtual cheater know where to go? We'll have to tell him:
driver.get('https://orteil.dashnet.org/cookieclicker/');
That's how we tell our automated browser what address to go to. Combining it together, our script looks like this:
const webdriver = require('selenium-webdriver');
const chrome = require('selenium-webdriver/chrome');
const chromedriver = require('chromedriver');

chrome.setDefaultService(new chrome.ServiceBuilder(chromedriver.path).build());
const driver = new webdriver.Builder().forBrowser('chrome').build();

const init = () => {
    driver.get('https://orteil.dashnet.org/cookieclieker/');
};

init();
Let's try to run what we’ve just programmed. We run our script through the terminal with the node command <name of .js file>, in my case: node cookie-bot.js (or by defining our startup script in package.json - we run it then with the command npm start - more on defining scripts can be found here). We should see the Chrome browser saying that it is controlled by the automated test software. If you got a similar result and nothing broke along the way - congratulations!

Now we can release our cheater and try to make it click the cookie. Let's stop for a second here, because we will need some knowledge on CSS selectors. If you are familiar with them - great, you will certainly not find anything that surprising. If it's a new thing for you or you want to refresh your knowledge, please look here and here.
Moving on to the program: now it's time to tell our bot where the cookie to click is located. To do it, we must go to our game and examine the clickable object. In Google Chrome it looks like this:
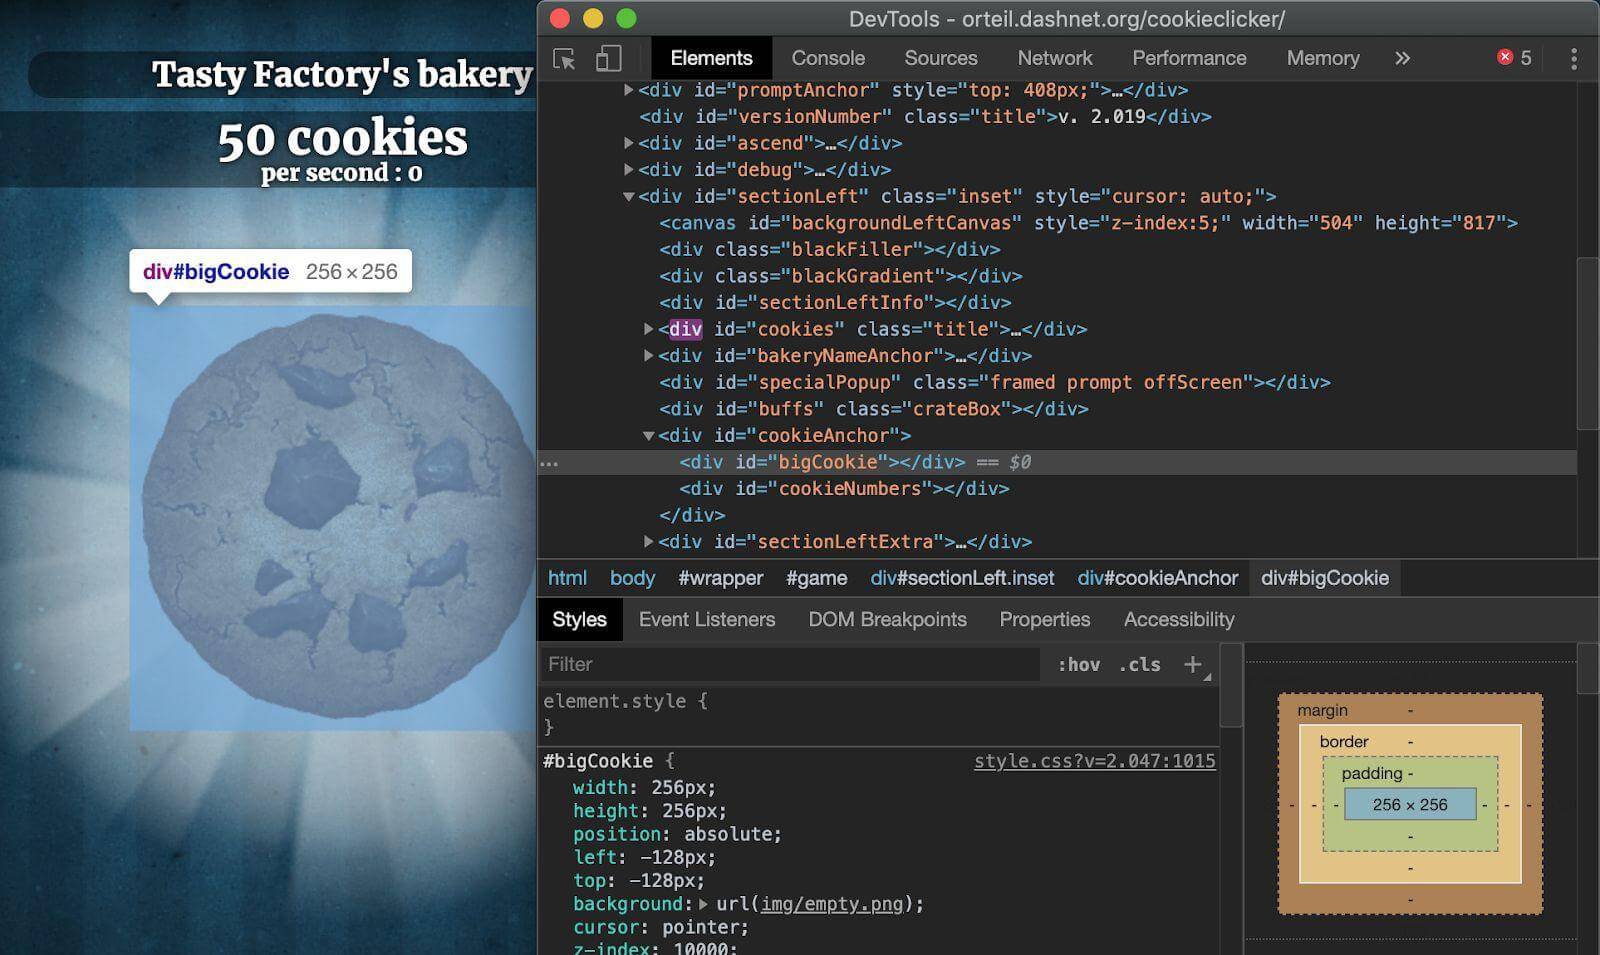
All simple and clear! Our cookie has a unique ID called 'bigCookie' - as if the game developers themselves encouraged cheating in their own game. Let's "catch" this element with our selector and try to tell the bot to click on it:
const cookieEl = driver.findElement({id: 'bigCookie'});
cookieEl.click();
As simple as that! It should work perfectly in most cases. But what if it doesn't? There's one thing you need to make sure of. When defining the 'cookieEl' element, we have to be absolutely sure that such an element is in the DOM tree (if you don't know what the DOM is, look here). If it's not there at the moment we define it, our script will return an error. So let's prepare a simple protection against this case:
driver.wait(webdriver.until.elementLocated({id: 'bigCookie'}));
const cookieEl = driver.findElement({id: 'bigCookie'});
cookieEl.click();
Now, let's tell our cheater to wait until the item with the 'bigCookie' ID is found. This way, we protect ourselves against a situation in which we would want to use an element that doesn’t exist on the site yet.
Running the script now will turn on the browser and make our bot click the cookie once. Yeah, I know, it doesn’t sound like a big cheat. So let’s spice the things up! We will make our bot click the cookie for example twice every second. Just like this:
const startInterval = () => {
    const cookieEl = driver.findElement({id: 'bigCookie'});
    setInterval(() => {
       cookieEl.click();
    }, 500);
};
You can find more about setInterval here. Finally, our script should look like this:
const webdriver = require('selenium-webdriver');
const chrome = require('selenium-webdriver/chrome');
const chromedriver = require('chromedriver');

chrome.setDefaultService(new chrome.ServiceBuilder(chromedriver.path).build());
const driver = new webdriver.Builder().forBrowser('chrome').build();

const startInterval = () => {
    const cookieEl = driver.findElement({id: 'bigCookie'});
    setInterval(() => {
        cookieEl.click();
    }, 500);
};

const init = () => {
    driver.get('https://orteil.dashnet.org/cookieclicker/');
    driver.wait(webdriver.until.elementLocated({id: 'bigCookie'}));
    startInterval();
};

init();
Now you can sit back and watch your bot do the clicking for you - your mouse will definitely appreciate it. Is that all? By no means. We are going for more! Now we will buy some in-game accessories that will speed up the collection of our cookies. Look at the right panel in the game - there is a list of things that we can buy:
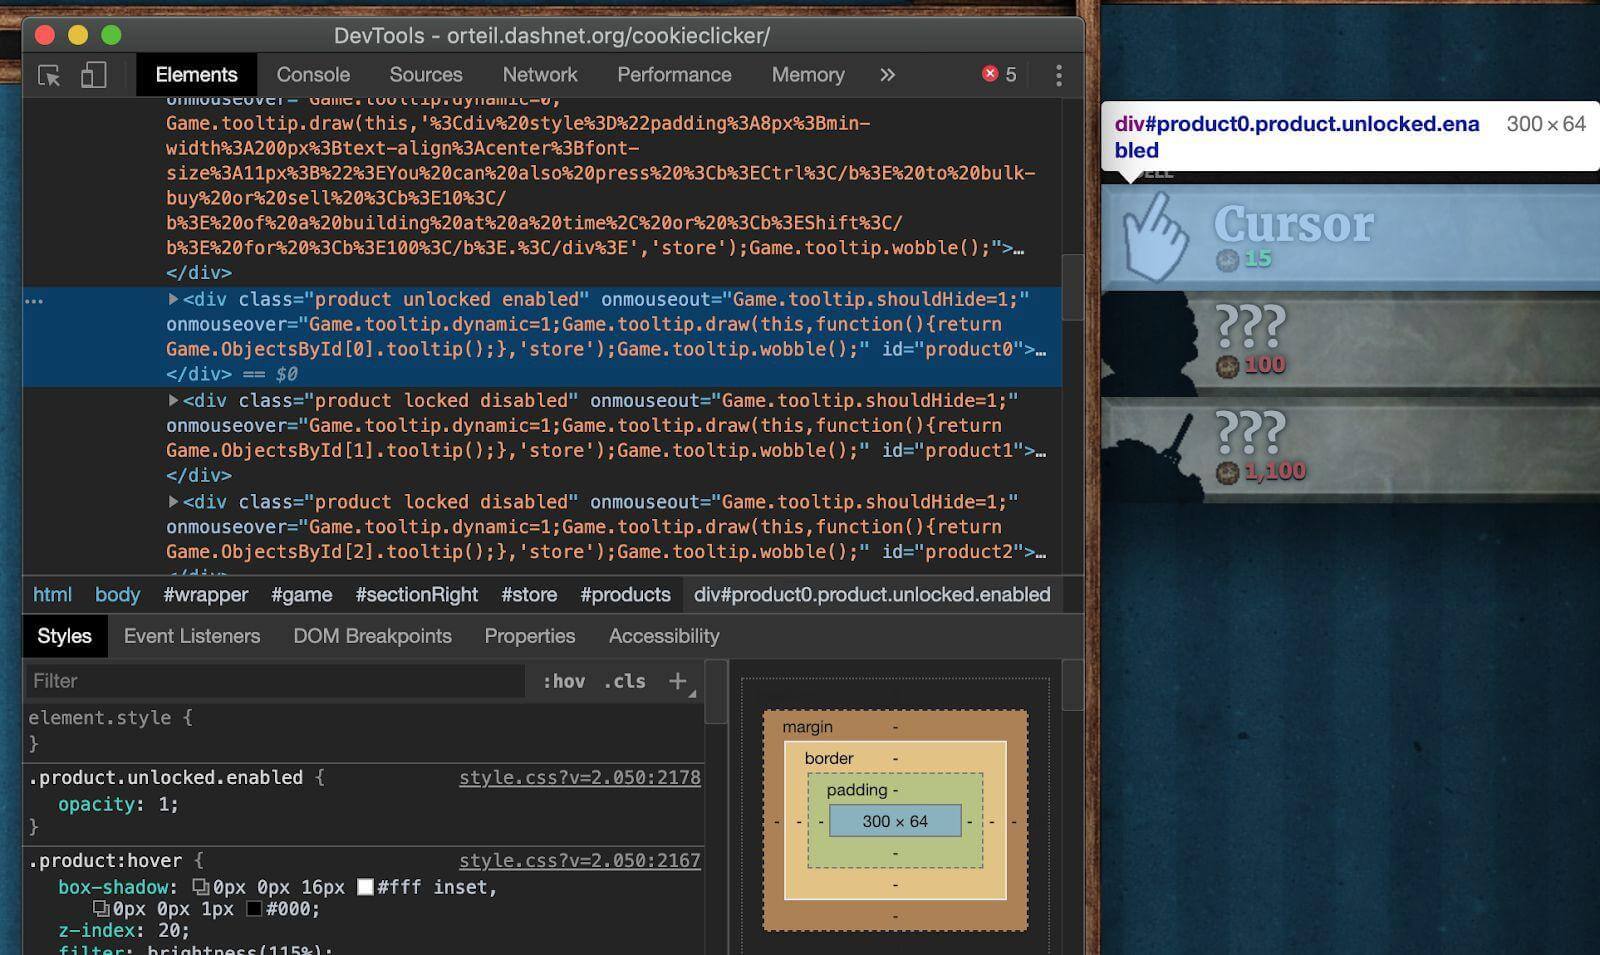
Do we want to buy these improvements ourselves? Of course not. It's a complete waste of time. We will have our bot do it! What connects all these improvements is the class - 'product'. As you can see, the things we can't buy have the 'locked' and 'disabled' classes. However, we are looking for those that we can buy - they have three classes: 'product', 'unlocked', 'enabled'. Let’s get them!
First of all, make sure that the list of elements with the class 'product' is in our DOM:
driver.wait(webdriver.until.elementLocated({className: 'product'}));
Now we can deal with the list itself. We will have to create a variable to which we will assign the list of items that we can click on:
const products = await driver.findElements({className: 'product unlocked enabled'});
Please note the method we use: findElements. It returns Promise as opposed to the findElement method, which returns ready-to-use WebElement. We are not interested in assigning to the 'products' Promise variable, but in what this Promise returns. That is why an await appeared in the variable definition. It forces us to be asynchronous in our function:
const checkProducts = async () => {
    const products = await driver.findElements({className: 'product unlocked enabled'});
};
Now just check if the 'products' array is not empty and click on its last element. Why the last one? The upgrades in the game are listed from the worst to the best one. With a choice between two improvements we can buy, we'll always choose the better one. Finally, our function should look like this:
const checkProducts = async () => {
    const products = await driver.findElements({className: 'product unlocked enabled'});
    if (products.length > 0) {
      products.pop().click();
    }
};
We check if the length of the array is greater than zero - if it is, then we are clicking on its last element. All we have to do is call our function at the right time. Luckily, we have an interval that is responsible for clicking our cookie - so let's use it:
setInterval(async () => {
   cookieEl.click();
   await checkProducts();
}, 500);
Eventually, our script looks like this:
const webdriver = require('selenium-webdriver');
const chrome = require('selenium-webdriver/chrome');
const chromedriver = require('chromedriver');

chrome.setDefaultService(new chrome.ServiceBuilder(chromedriver.path).build());
const driver = new webdriver.Builder().forBrowser('chrome').build();

const checkProducts = async () => {
    const products = await driver.findElements({className: 'product unlocked enabled'});
    if (products.length > 0) {
       products.pop().click();
    }
};

const startInterval = () => {
    const cookieEl = driver.findElement({id: 'bigCookie'});
    setInterval(async () => {
       cookieEl.click();
       await checkProducts();
    }, 500);
};

const init = () => {
    driver.get('https://orteil.dashnet.org/cookieclicker/');
    driver.wait(webdriver.until.elementLocated({id: 'bigCookie'}));
    driver.wait(webdriver.until.elementLocated({className: 'product'}));
    startInterval();
};

init();
30 lines of pure cheat. With the bot doing all the clicking, we can spend our time on something different... Maybe programming another bot?
Summing up
Despite the relatively small amount of code that I have prepared here, I showed you a very interesting tool which is Selenium WebDriver. Of course, it wasn't created to cheat at games. It is used in the automation of testing web applications. Once prepared, it saves a lot of time in application regression testing. If you ever considered becoming a tester of such applications, it’s an absolute must-have in your toolbox.
This tutorial is just a brief coverage of a vast topic of automating actions happening in the browser. We hope it will encourage you to dig deeper and come up with great solutions to make your everyday work more efficient. We don't want to waste time on routine, do we?
 Angry Nerds (Poland)
 Angry Nerds (USA)
 Angry Nerds (Canada)


